# Building a stopwatch with HTML, CSS and JavaScript
One of the most effective ways of mastering the field of web development is by building real-world projects with practical use cases. I will be going through a step-by-step tutorial on building a stopwatch with HTML, CSS, and plain JavaScript.
The project is available on CodePen with the source code
%[https://codepen.io/MichaelEnigma/pen/LYzNaKw]
I urge you to also try to tweak the code and add a little stuff here and there, different colors, new features, you could even go ahead and add a countdown feature, that's how we master web development concepts.
**HTML**
Let's start with the basic HTML structure
```
StopWatch
000000
```
So to the skeleton of the code is quite simple we add three '00' and three buttons. We will be using *div *and *span *tags as containers to effectively style the HTML elements.
A *div *is a block element so it starts on a new line and occupies the full width of the screen, on the other hand, a *span *tag is an inline element container, in other words, it doesn't start on a new line and can be used to style just a small part of a text.
We also added several attributes to the different elements like the id and class for the styling, the *onclick *event attribute to be used in javascript, we examine them as we go along.
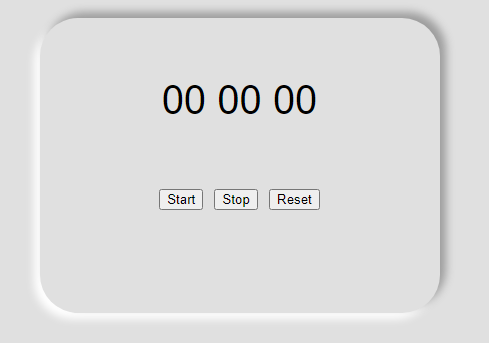
This how it going to look like now

**CSS**
So for the *body *element, we add the *font* to *Arial *and set its background to light gray
then for the *div * with the id of *mainstopwatch * we add the following styles to it to give it shape and beauty.
We use the *margin* and *padding* properties to properly position it in relation to the screen, the *text-align* centers the text, the *border-radius* makes its corners rounded.
Note how the box-shadow style brings out a unique effect by adding light and dark shadows to the Stopwatch outline.
```
body {
font-family: arial;
background: #e0e0e0;
}
#mainstopwatch{
width: 300px;
margin: 100px auto;
padding: 60px 50px 100px;
text-align: center;
font-size: 40px;
border-radius: 38px;
box-shadow: 6px -6px 8px #9d9d9d,
-6px 6px 8px #ffffff;
}
```
The rest of the styling is easy to follow along, the *span*'s display is set to *inline-block*.
The *nth-of-type* and *last-child* selectors are used to give varying background colors to the buttons, the buttons are made to have a change in background color on *hover*.
This is the complete CSS code
```
body {
font-family: arial;
background: #e0e0e0;
}
#mainstopwatch{
width: 300px;
margin: 100px auto;
padding: 60px 50px 100px;
text-align: center;
font-size: 40px;
border-radius: 38px;
box-shadow: 6px -6px 8px #9d9d9d,
-6px 6px 8px #ffffff;
}
#mainstopwatch span {
width: 55px;
color:#0776de;
margin: 3px;
padding: 10px;
border-radius: 38px;
display: inline-block;
box-shadow: 6px -6px 8px #9d9d9d,
-6px 6px 8px #ffffff;
}
#mainstopwatch button {
border: none;
-webkit-appearance: none;
font-size: 22px;
width: 140px;
height: 55px;
color: white;
background-color: #2e80b3;
border-radius: 33px;
transition: .3s;
box-shadow: 6px -6px 8px #9d9d9d,
-6px 6px 8px #ffffff;
}
#mainstopwatch button:nth-of-type(2) {
background-color: #ae7617;
}
#mainstopwatch button:last-child {
margin-top: 12px;
background-color: #17ae38;
}
#mainstopwatch button:hover {
background: #333;
color: #e0e0e0;
border-radius: 38px;
}
```
And this is how it should look

**JavaScript**
Now we are at the *meat* of the work, we have a pretty-looking stopwatch, but the only thing now is that it doesn't work yet. It's from adding the relevant Javascript code that we get it to work properly.
Here it is.
```
var timer = 0;
var timerInterval;
var ms = document.getElementById('milliseconds');
var second = document.getElementById('mainsecond');
var minute = document.getElementById('mainminute');
```
The variables we'll be using are initialized here, the *timer* is set to 0 by default and we use the *getElementById* method to access the three spans we created all using their respective ids
```
function start(){
stop();
timerInterval = setInterval( function(){
timer += 1/60;
msVal = Math.floor((timer - Math.floor(timer) )*100); // Gives the milliseconds value
secondVal = Math.floor(timer) - Math.floor(timer/60) *60; // Gives the Second values
minuteVal = Math.floor(timer/60); // Gives the Minute value
ms.textContent = msVal <10 ? "0" + msVal.toString() : msVal;
second.textContent = secondVal < 10 ? "0" + secondVal.toString() : secondVal;
minute.textContent = minuteVal < 10 ? "0" + minuteVal.toString() : minuteVal;
}, 1000/60);
}
```
Let's examine the above function *start()*, from the first line the function *stop()* is called which we'll look at later, the *setInterval* method *timerInterval* calls an anonymous function every millisecond this makes the *timer* variable initially set at 0 add a millisecond each time.
For the getting the milliseconds, seconds, and minutes value the *Math.Floor* function was heavily used, this function returns the highest integer less than or equal to the given number.
For example;
```
console.log(Math.floor(5.95));
// expected output: 5 ```
To get the current millisecond value the *timer *value is subtracted from its floored value, multiplied by 100, and floored again.
The second value, the *timer *is already in seconds, we use it with a *Math.floor* expression to make sure it shows the exact second.
The minute value is gotten by dividing the *timer *by 60.
For the next three lines, the values of the respective spans are changed with the *.textContent* method using a ternary operator to add an extra '0' to values less than 10
```
function stop(){
clearInterval(timerInterval);
}
function reset(){
stop();
timer = 0;
ms.textContent = '00';
second.textContent = '00';
minute.textContent = '00';
}
```
For the next function *stop()* which was called in the first line of the previous function it simply makes use of the *clearInterval* function to stop the SetInterval function.
It is also used in the first line of the *reset()* function. In the *reset()* function the values of all the values are set to their default state.
Every button calls a similarly named function based on the *onclick* event attribute. Here is the full Javascript code below
```
var timer = 0;
var timerInterval;
var ms = document.getElementById('milliseconds');
var second = document.getElementById('mainsecond');
var minute = document.getElementById('mainminute');
function start(){
stop();
timerInterval = setInterval( function(){
timer += 1/60;
msVal = Math.floor((timer - Math.floor(timer) )*100); // Gives the milliseconds value
secondVal = Math.floor(timer) - Math.floor(timer/60) *60; // Gives the Second values
minuteVal = Math.floor(timer/60); // Gives the Minute value
ms.textContent = msVal <10 ? "0" + msVal.toString() : msVal;
second.textContent = secondVal < 10 ? "0" + secondVal.toString() : secondVal;
minute.textContent = minuteVal < 10 ? "0" + minuteVal.toString() : minuteVal;
}, 1000/60);
}
function stop(){
clearInterval(timerInterval);
}
function reset(){
stop();
timer = 0;
ms.textContent = '00';
second.textContent = '00';
minute.textContent = '00';
}
```
And there we have it a fully working stopwatch.

So like I earlier advised try and *own* the code, you can build on it or just get inspired to build something else that is really cool. If you have any useful suggestions or ideas let me know in the comment section. Thanks for your time.